If you suspect your rain gauge is reading incorrectly you can perform the following test and calibration procedure.
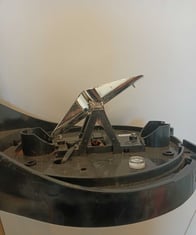
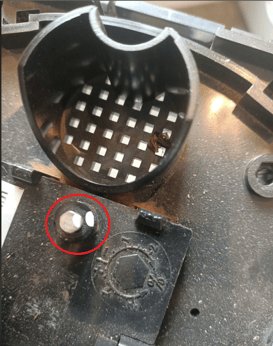
The following testing and calibration procedure applies to the Davis® double tipping rain gauge only. You can check which type of gauge you have by removing the rain bucket by twisting anti clockwise and lifting it off. The double tipping rain gauge mechanism can be identified by the 2 silver cups.
If you suspect your Davis® Rain Gauge (double tipper) is not recording rain accurately, you should first check that your gauge is clean and level, and that you are comparing your readings to an appropriate alternative device.
Check out this information before attempting to calibrate your rain gauge, as many inaccuracies are due to factors outside the mechanism itself.
https://help.incyt.io/knowledge/how-to-davis-rain-gauge-troubleshooting
To test the accuracy of the Davis® Rain Gauge, you need to pass an exact amount of water (128 ml) slowly through the rain collector, and count the number of “tips” of the mechanism. This 128 ml is the equivalent of 6mm of rainfall, or 30 “tips” of the bucket mechanism.
Note: When testing and calibrating your Weather Station or Rain Gauge, it should be disconnected from the Bluenode to ensure readings are NOT recorded to the Dashboard .
The most difficult aspect to this calibration procedure is coming up with a way to slowly drip the water into the collector, to ensure the tippers aren’t overwhelmed. There’s several ways you can do this, but this method utilizes commonly found household items that can be easily assembled.
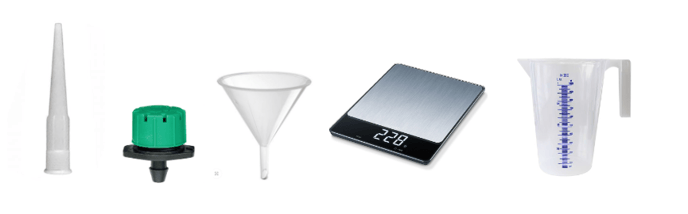
Material Requirements
Container (Jug) for water
Digital weigh scales
128ml of water
Funnel
Silicone tube nozzle
Adjustable Flow Garden Irrigation dripper
Support for dripper system over rain collector
Testing Procedure
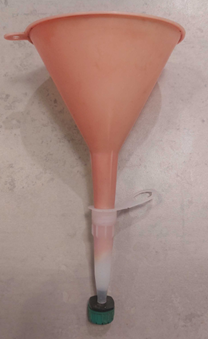
Assemble your “dripping” device. To do this, you can use a Funnel, an Adjustable Flow Garden irrigation dripper, and a nozzle for a silicone tube. (All readily available cheaply from a Hardware store). The Adjustable Flow Garden irrigation dripper should be fitted securely into the end of the silicone tube nozzle, and the funnel then placed firmly into the other end as shown. Adjust the dripper to roughly the 1/2 way mark and test to make sure water drips through freely, and there are no leaks from any joins.
Unplug the cable from the bottom of the Bluenode, to ensure you don’t record the rain on your dashboard.
Check that the rain collector is free from all debris and the drain hole in the bottom is not blocked.
The easiest way to accurately measure out 128 ml of water is to weigh it – i.e., 128g = 128ml
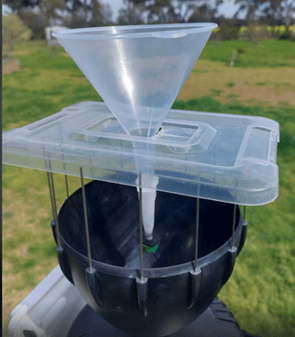
Place your dripping device over the Rain collector as shown.
Once you have everything set up, pour the 128ml of water into the funnel and allow the water to drip into the collector. You should hear the tipping mechanism activating as the water flows through.
If you have used the adjustable nozzle, as specified above, you can adjust the rate at which the water drips. You should be aiming to drip the 128ml of water into the bucket over approximately a 10-minute period. You will need to listen closely, to hear the tippers activate. 128ml of water should equate to 30 tips of the mechanism.
Record the number of tips you hear, and if possible, repeat the procedure 2 or 3 times to ensure you get a consistent result.
NOTE : At the end of each test, check how much water is sitting in the tipper, to ensure you account for all the water in the system. You might hear 27 tips, and the tipper is half full. You could call that 27.5 tips.
Calculate the percentage of over reading or under reading, and if required, adjust the calibration of your rain gauge as follows.
Calibration Procedure
NOTE : This calibration applies to the “double tipper” mechanism only.
Once you have worked out the percentage over or under, that your rain gauge is reading, its possible to physically calibrate the tipping mechanism via the adjustment screws.
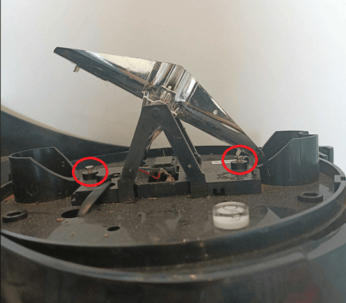
A full turn of the screws anti clockwise (both must be adjusted) will increase the rain readings by approximately 6%. Likewise, a full turn clockwise will decrease readings by approximately 6%.
Prior to adjusting the screws, it’s a good idea to mark the starting point on the screw head and the rain gauge base.
After adjusting BOTH calibration screws the desired amount, retest the gauge.
If necessary, make minor adjustments and retest, until the rain gauge is reading accurately.